The day the network drive stops being good enough
Every SOLIDWORKS team reaches the same moment. The shared drive has three folders called Released, Released_old and RELEASED_DO_NOT_USE. Two engineers have the same assembly open, and the last one to save wins. Someone asks for "the current drawing" and nobody can answer with confidence.
That is the point at which you install SOLIDWORKS PDM and create your first vault — a managed store for your files, with check-in/check-out, version history, revisions and an approval workflow.
This guide walks through the whole setup in order, from a blank server to a vault your team can actually work in. If you have not yet chosen between PDM Standard and PDM Professional, read our companion article SOLIDWORKS PDM Standard vs Professional: Which Do You Need? first — the edition you pick changes what happens in Step 3.
Before you start — the checklist
| Item | What you need |
|---|---|
| SOLIDWORKS PDM version | Match your SOLIDWORKS release. Every machine that hosts a server or client must run the same major version — service packs may differ, years may not. |
| Server machine | A dedicated Windows Server (or a well-specified workstation for a very small team) that stays on. Not a laptop that leaves the building. |
| Database | SQL Server Express for PDM Standard (free). SQL Server Standard or Enterprise for PDM Professional (separately purchased). |
| License server | SolidNetWork License Manager installed and activated with your PDM serial number. |
| Storage | A separate archive location with room to grow, plus a backup target. Vault data grows quietly and permanently. |
| Static addressing | Fixed IP / DNS name for the server. A vault that moves is a vault that breaks. |
One thing worth saying plainly up front: the install is the easy half. A working vault that a design office will actually adopt depends on the configuration you do in Steps 6 and 7 — folder structure, data cards, revisions and workflow. Budget your time accordingly.
Step 1 — Confirm the edition
Keep it simple:
- PDM Standard — Suitable for single site, up to 10 CAD Editor seats, SQL Server Express, one approval workflow. This is the right starting point for most small and mid-sized design offices.
- PDM Professional — separately licensed, needs a purchased SQL Server, unlimited users and workflows, replication, Web client, API and automation.
Step 2 — Verify system requirements and gather the file set
Check the server against the official SOLIDWORKS system requirements for your exact version — paying attention to supported Windows builds and SQL editions. Then download the SOLIDWORKS installation file set, or use the SOLIDWORKS Installation Manager.
If you receive a zipped file set, extract it with 7-Zip rather than Windows' built-in extractor; the built-in tool can block the HTML files and the installer will misbehave quietly.
Step 3 — Install SQL Server

If you have an existing supported SQL instance, you can reuse it — otherwise install one. SQL may live on the same machine as PDM or on a separate database server.
- Close all Windows applications, including File Explorer.
- Download the installer from Microsoft and run Setup as Administrator.
- Choose New SQL Server stand-alone installation, accept the license terms.
- Under Instance Features select Database Engine Services. Under Shared Features add Client Tools Connectivity and Client Tools Backward Compatibility (SQL Express presents a shorter list — take what it offers).
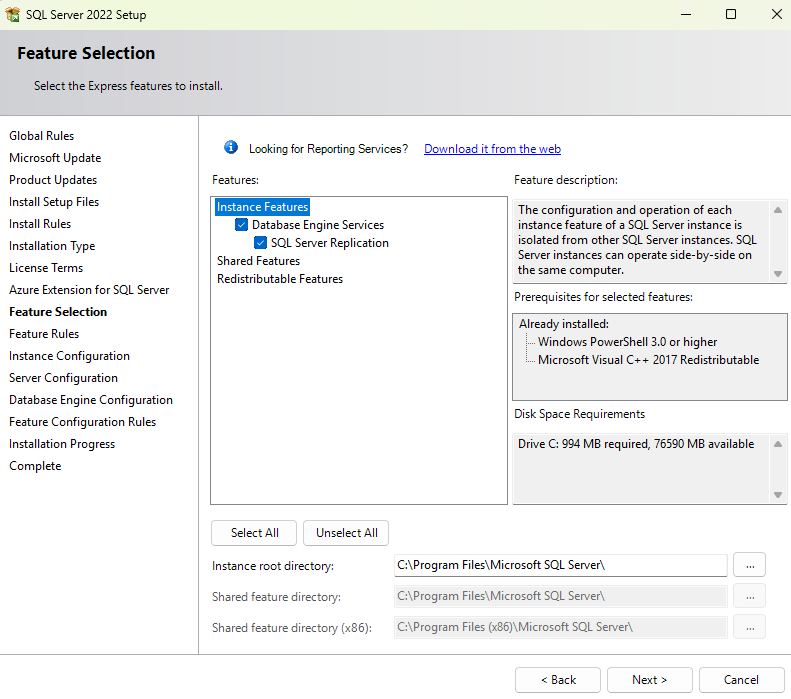
- Use the Default Instance unless you have a deliberate reason not to.
- On the Server Configuration tab, confirm the Database Engine service starts automatically. Leave the collation at the default
SQL_Latin1_General_CP1_CI_AS— PDM Standard will not run on a binary collation. - On the Database Engine Configuration tab, select Mixed Mode (SQL Server and Windows authentication). Set a strong SA password and write it down — you will need it when the vault wizard asks for a database login. Do not leave it blank.
- Leave the FILESTREAM defaults alone. Change data directories only if you have a storage policy that requires it.
- Finish the install, restart if it does not do so automatically, and apply any required cumulative updates.
- Install SQL Server Management Studio (SSMS) afterwards for administration.
Two details that trip people up later:
- PDM Standard vaults on SQL Express listen on a dynamic port by default. Set the instance to a static TCP port and open that port in the firewall — otherwise clients will connect today and fail after the next restart.
- PDM Professional vaults need TCP/IP and remote access enabled on the SQL instance if the database is on a separate machine.
Step 4 — Install and activate the SolidNetWork License Manager
- Launch the SolidNetWork License Manager from the Start menu (Windows 11 keeps it under All Apps → SOLIDWORKS Tools).
- If no activation prompt appears, go to the Administration tab and choose Modify → Activate/Reactivate.
- Keep "A firewall is in use on this server" checked and enter the computer name hosting the licence manager.
- On current versions, add your serial numbers here — click Add and enter one per line.
- Select all products, choose Automatically over the internet, add your contact email, and finish.
Note the address format the vault wizard will want later: port@SNLServerName (for example 25734@PDMSERVER).
Step 5 — Install the PDM server components
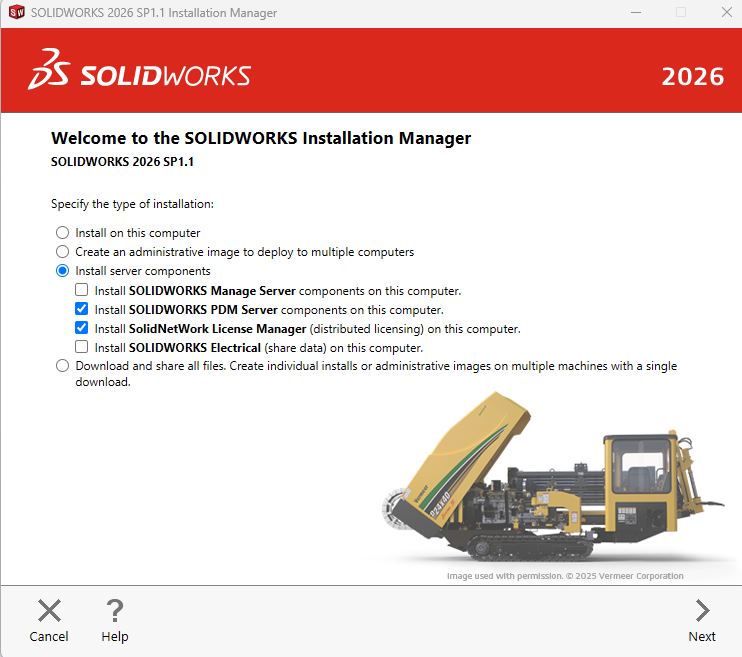
Run the SOLIDWORKS Installation Manager on the server and select the SOLIDWORKS PDM Server components (the exact wording varies by version — Server, Database and Archive components). Point the installer at your SQL instance when asked.
The recommended order for a LAN installation is : SQL → license manager → PDM server components → create vault → install clients. Do not install clients until the vault exists, or you will be opening a client with nothing to connect to.
Step 6 — Create the vault
The vault is created once, from the Administration tool.
- On a machine with the PDM client installed, open SOLIDWORKS PDM → Administration from the Start menu.
- If your archive server is not listed, add it. Then right-click the server name in the left pane and choose Create new vault.
- Work through the vault setup wizard:
| Wizard screen | What you do |
|---|---|
| Choose Vault Type | Select Standard or Professional to match your license. |
| Choose vault name | A short, stable name and an optional description. Keep it simple — designers will see it every day. |
| Select vault archive folder | Where the file archive physically lives. Point it at storage that will grow, not at the OS drive. |
| Choose database | Enter your SQL server instance and a database name. A Standard vault must be hosted on SQL Server Express. If a SQL login box appears, supply the sa account and the password you set in Step 3. |
| License Server for Vault | port@SNLServerName — the license server activated for this edition. |
| Select regional settings | Language for the vault. |
| Create the admin user | Use the default admin password for the archive server, or set a vault-specific one. Then change it — see Step 7. |
| Configure vault | Import an administrative export file (.cex), or pick a predefined configuration. |
| Review Information | Check every parameter, then Finish. |
Which predefined configuration should you pick?
- Quick Start — a simple, working data set with sensible predefined groups and permissions, a default folder card, a single SOLIDWORKS card, standard BOMs and search favourites. For a first vault, this is usually the right answer: it gives you something usable immediately.
- Empty — a bare vault with nothing in it. Choose this if you plan to build everything yourself or import your own
.cex. - Default — the fuller legacy sample data set. More to look at, more to unpick.
If you import a .cex into a Standard vault, only Standard-supported features come across — anything unsupported is silently skipped, so verify afterwards rather than assuming.
Step 7 — Configure the vault before anyone logs in
This is the step people rush, and it is the one that decides whether PDM sticks. Do it while the vault is still empty.
- Change the admin password immediately, and create named admin accounts. Never run a live vault on the default admin login.
- Create users and groups — mirror your real roles (Design, Drafting, Manufacturing, Purchasing, Approver). Assign permissions to groups, not individuals, so you can add a person without rebuilding rights.
- Design the folder structure and numbering before files arrive. Project-based folders plus a part-numbering convention is far easier to set up now than to retrofit onto 20,000 files.
- Build your data cards — the fields a designer fills in (part number, description, material, revision, approved by). These drive search, BOMs and workflow transitions, so get the fields right early.
- Define the revision scheme — typically A, B, C… on release, with a separate working revision if your process needs one.
- Set up the workflow — the states and transitions a file passes through, e.g. In Work → In Review → Released, and who may move a file between them. On PDM Standard you have a single workflow and up to ten states, so design it deliberately.
- Turn on automatic PDF/DXF generation on release if the shop floor or purchasing need a read-only copy without a SOLIDWORKS license.
The goal: a designer checks a file in and everything a manager needs — revision, approvals, searchable metadata — is produced automatically rather than remembered.
Step 8 — Install the clients and connect
- Install the same major version of the PDM client on every workstation, using the Installation Manager. Mixing years between server and client is the single most common cause of "the vault is missing" support calls.
- In SOLIDWORKS, check the PDM add-in is enabled so the vault appears in the Task Pane.
- Open the vault from the Windows Explorer view, log in as a created user, and add the vault view to the local machine.
- Test the full loop with one real assembly: check out, edit, check in, transition through the workflow, generate the released PDF. Do this before migration, not after.
- Migrate existing data in a controlled pass — not by dragging the whole network drive in on a Friday.
Step 9 — Back up, then go live
A vault is now your single source of design truth, which means it is also your single point of failure. Put a backup regime in place before go-live: the vault database, the archive files, and the SQL database together. Test that you can restore.
Then train the team on three rules, because these are the ones that erode first:
- Everything goes in the vault. A file saved outside it does not exist.
- You check out before you edit, and you check in when you are done.
- The workflow is the approval. A verbal "it's approved" is not a revision.
The mistakes we see most often
- Version mismatch between server and clients — the vault simply will not appear.
- Dynamic SQL Express port left unset, so everything works until the next reboot.
- Blank SA password recorded nowhere, discovered the first time the vault needs a database login.
- Complicated folder structure invented before anyone understood how the team actually names things.
- Workflow designed for the org chart rather than for the document — approvals stall because too many people can block a release.
- No backup tested until the day it was needed.
What we usually find
In our experience with Indian machine-building, automotive-component and defence customers, a first vault takes roughly a day to install and a few days to configure properly. Teams that treat the configuration as the real project end up with a vault designers trust; teams that treat it as a tick-box end up with a shared drive that happens to have a check-in button.
PDM Standard is genuinely capable for a small single-site team, and if you are already on SOLIDWORKS Professional or Premium, it is included in your subscription — this is software you already own. The work is in setting it up to match how your office actually releases a drawing.
Want a hand with the first vault? Send us your design-seat count, your server setup and how a drawing currently gets approved. That is usually enough for us to map the structure, workflow and revision scheme, and to get you from a network drive to a working vault without a false start.