
Every drawing office has a version of the same story: the work that matters is the thinking, but most of the day disappears into mechanics — finding the right tool, redrawing a detail for the fifth time, untangling layers, and re-typing information that the drawing already knows. DraftSight is a mature 2D drafting platform, and the drafters who get the most from it are not the ones who know the most commands. They are the ones who set the tool up properly once and then stop fighting it.
This guide covers ten habits in the order they tend to pay back. For each one you get what the feature actually is, why it saves time, how to set it up, and which DraftSight tier it needs. Most of these need no new licence at all — that is the point.
1. Drive DraftSight from the command line, not the ribbon
What it is. DraftSight carries an AutoCAD-compatible command line and command alias set. If you have used AutoCAD, the muscle memory transfers directly — E or Erase runs Delete, L or Line starts a line, and the standard command vocabulary behaves the way you expect. DraftSight has never been a "looks like AutoCAD but isn't" experience; it is deliberately command-compatible, which is precisely why AutoCAD shops migrate to it with so little friction.
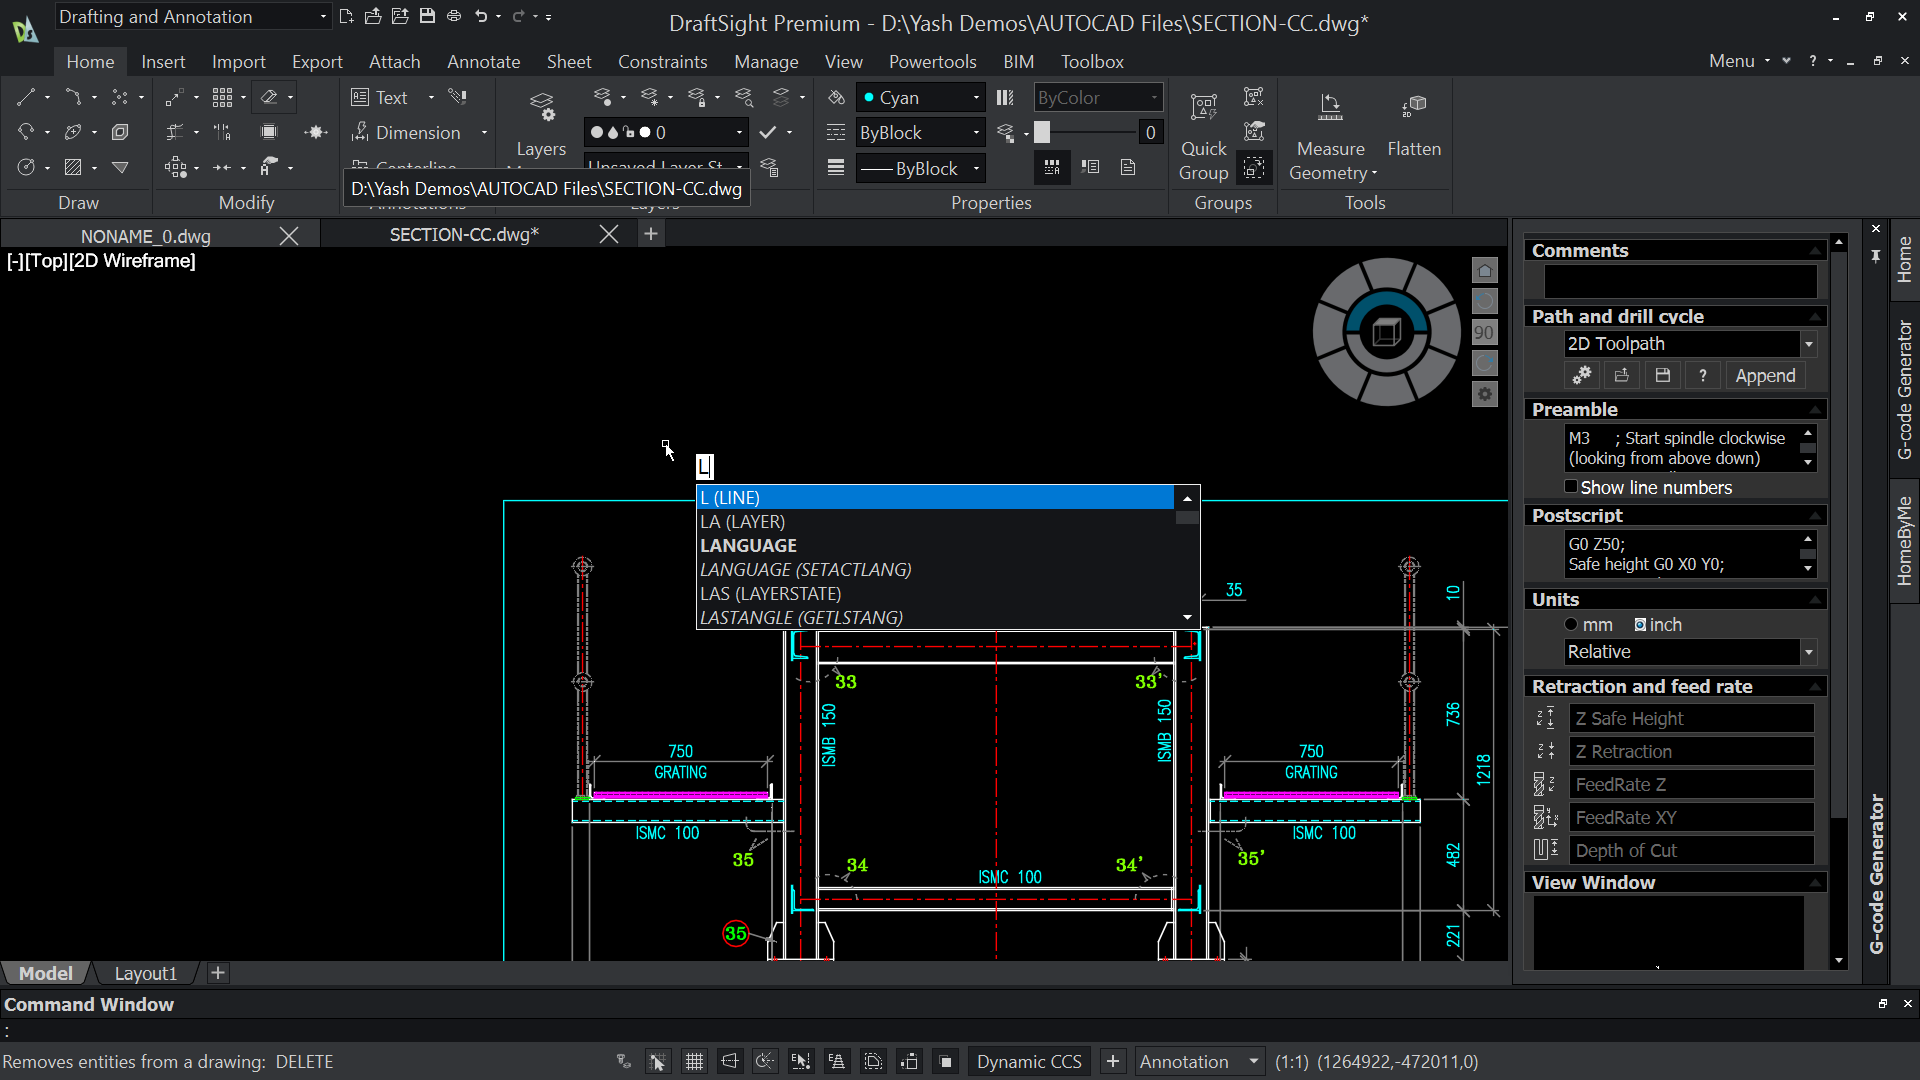
Why it matters. A ribbon button demands that you find it with your eyes — scan a tab, locate a panel, identify an icon. Typing two or three letters demands nothing but motor memory. On a command you run a hundred times a day, that difference compounds across the month into real hours. The ribbon is excellent for discovery; the command line is better for production. Use the first to learn and the second to work.
How to use it.
- Turn the command line on and keep it docked where your eye naturally falls — usually the bottom of the drawing area.
- Adopt the alias habit deliberately for one week. Force yourself to type instead of reaching for the ribbon, even when it feels slower initially. It will not feel slower by Friday.
- Use the spacebar or Enter to repeat the last command rather than re-invoking it. This is one of the biggest hidden time-savers in any command-driven CAD, and most users under-use it.
- If you have favourite or in-house routines, map short aliases to them so your own commands are as fast as the built-in ones.
Also worth knowing. DraftSight lets each user choose between a ribbon interface and a classic toolbar with pull-down menus. That choice matters in a mixed team: the drafter who has used toolbars for twenty years is not forced to relearn a layout in order to be productive from day one.
Tier. Every tier.
2. Set up mouse gestures and trim the heads-up display
What it is. Mouse gestures let you fire a command by flicking the mouse in a direction while holding the right button, instead of travelling to a toolbar. The heads-up display is the contextual tooltip cluster that appears near your cursor. Both are configurable, and both are usually left at their defaults — which is a mistake.
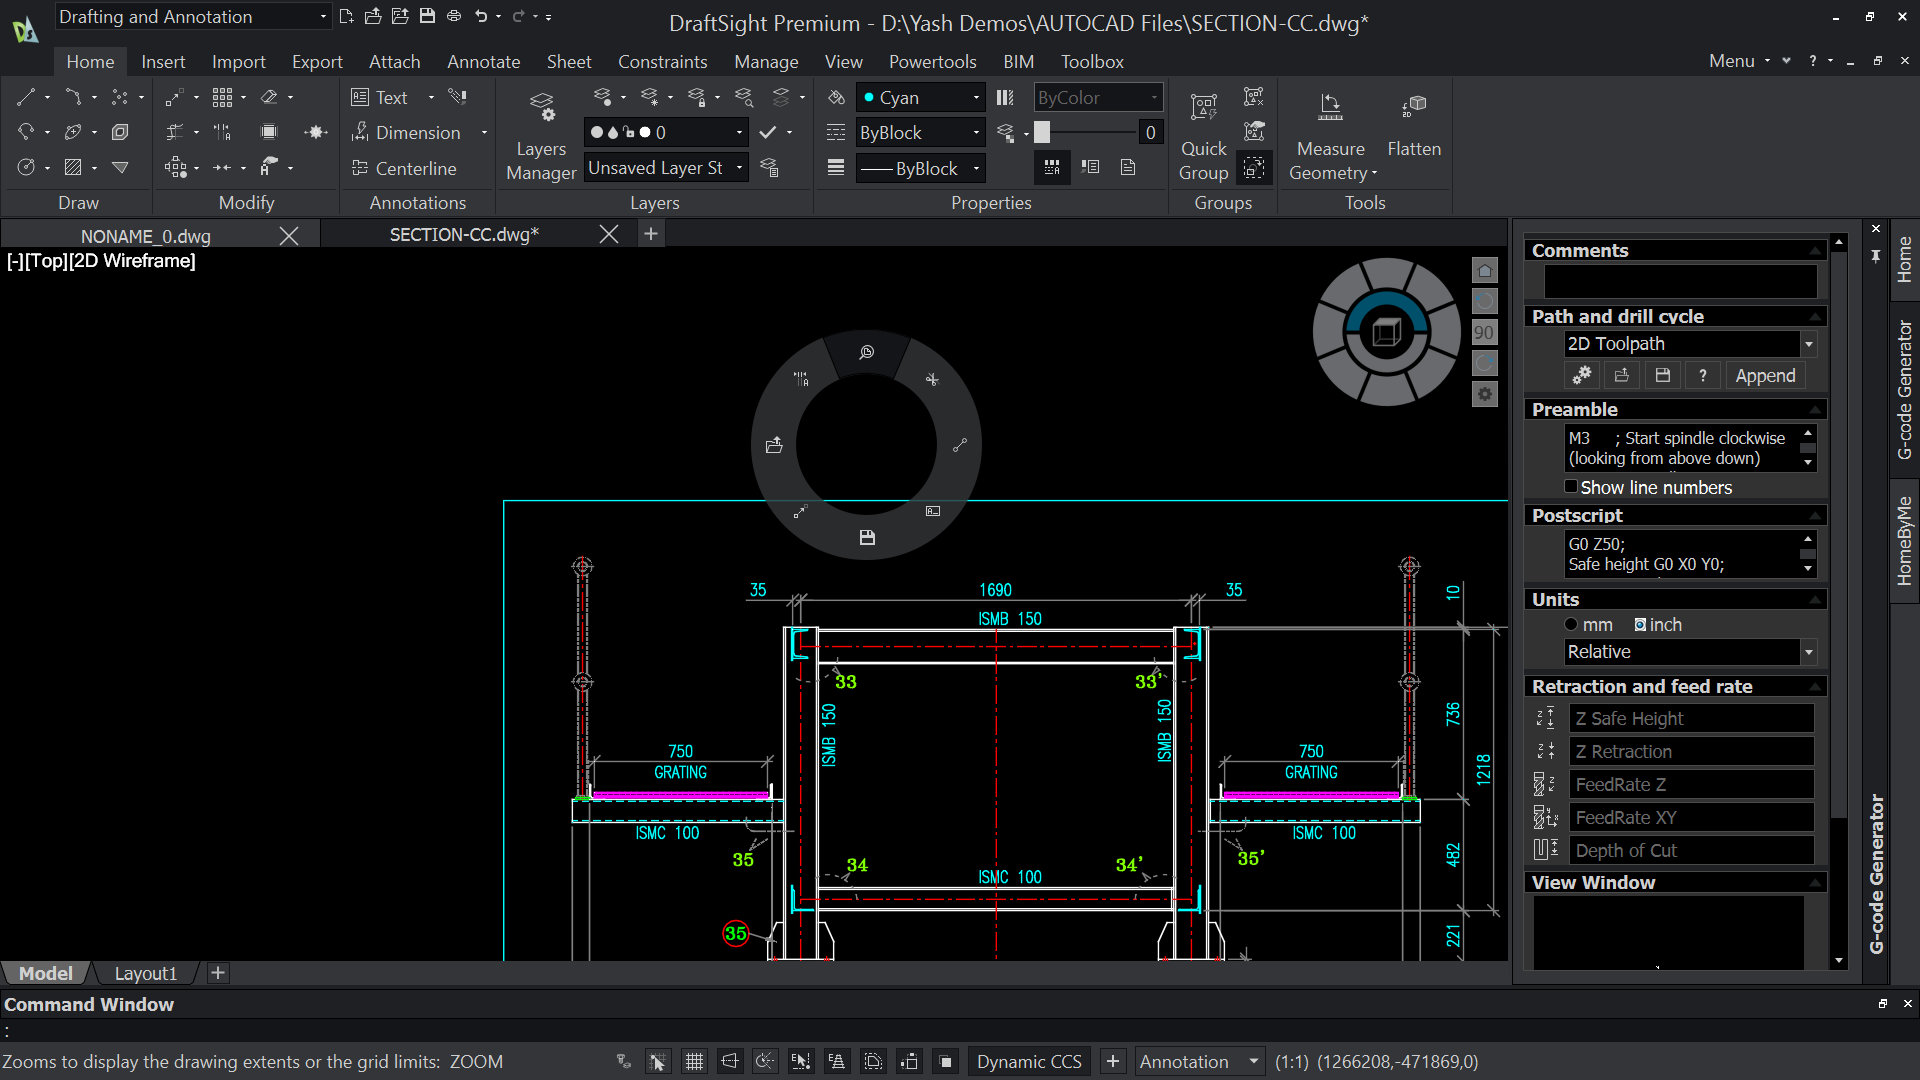
Why it matters. Every time your cursor leaves the geometry to visit a toolbar, you pay twice: once for the trip out, and once to find your place again. Mouse gestures remove most of those trips. Meanwhile, an untuned heads-up display is a usability problem in both directions — set the delay too short and it flickers into your way, too long and it never helps. Tuned correctly, it becomes information that arrives exactly when you want it.
How to use it.
- Enable mouse gestures in DraftSight's user settings or preferences.
- Assign commands to each gesture direction. The right choice is not the commands you think are impressive, but the four to eight you genuinely repeat all day — Undo, Erase, Move, Copy, Match Properties, measure tools. Watch your own work for a week and note what you reach for most.
- Tune the heads-up display delay to suit your tempo. Drafters who work fast generally want it slightly slower; drafters who work carefully generally want it quicker.
- Switch to small icons if you work on a laptop or a single monitor. Recovering that screen real estate is worth more than large icons.
- Set your entity highlight style — coloured or dashed line-style — so preselection is unmistakable on a dense drawing. On a busy sheet, "which line am I about to delete?" should never be a question you have to ask.
Tier. Every tier.
3. Use layer isolation instead of manually switching layers off
What it is. Isolate Layer reduces the display to a chosen layer or layers in one step. Hide Layer removes selected layers from view without permanently changing their state. Group filters let you organise large layer lists into named groups, so a whole discipline or zone can be isolated as a unit. And MatchLayer moves entities onto another layer by matching an existing object.
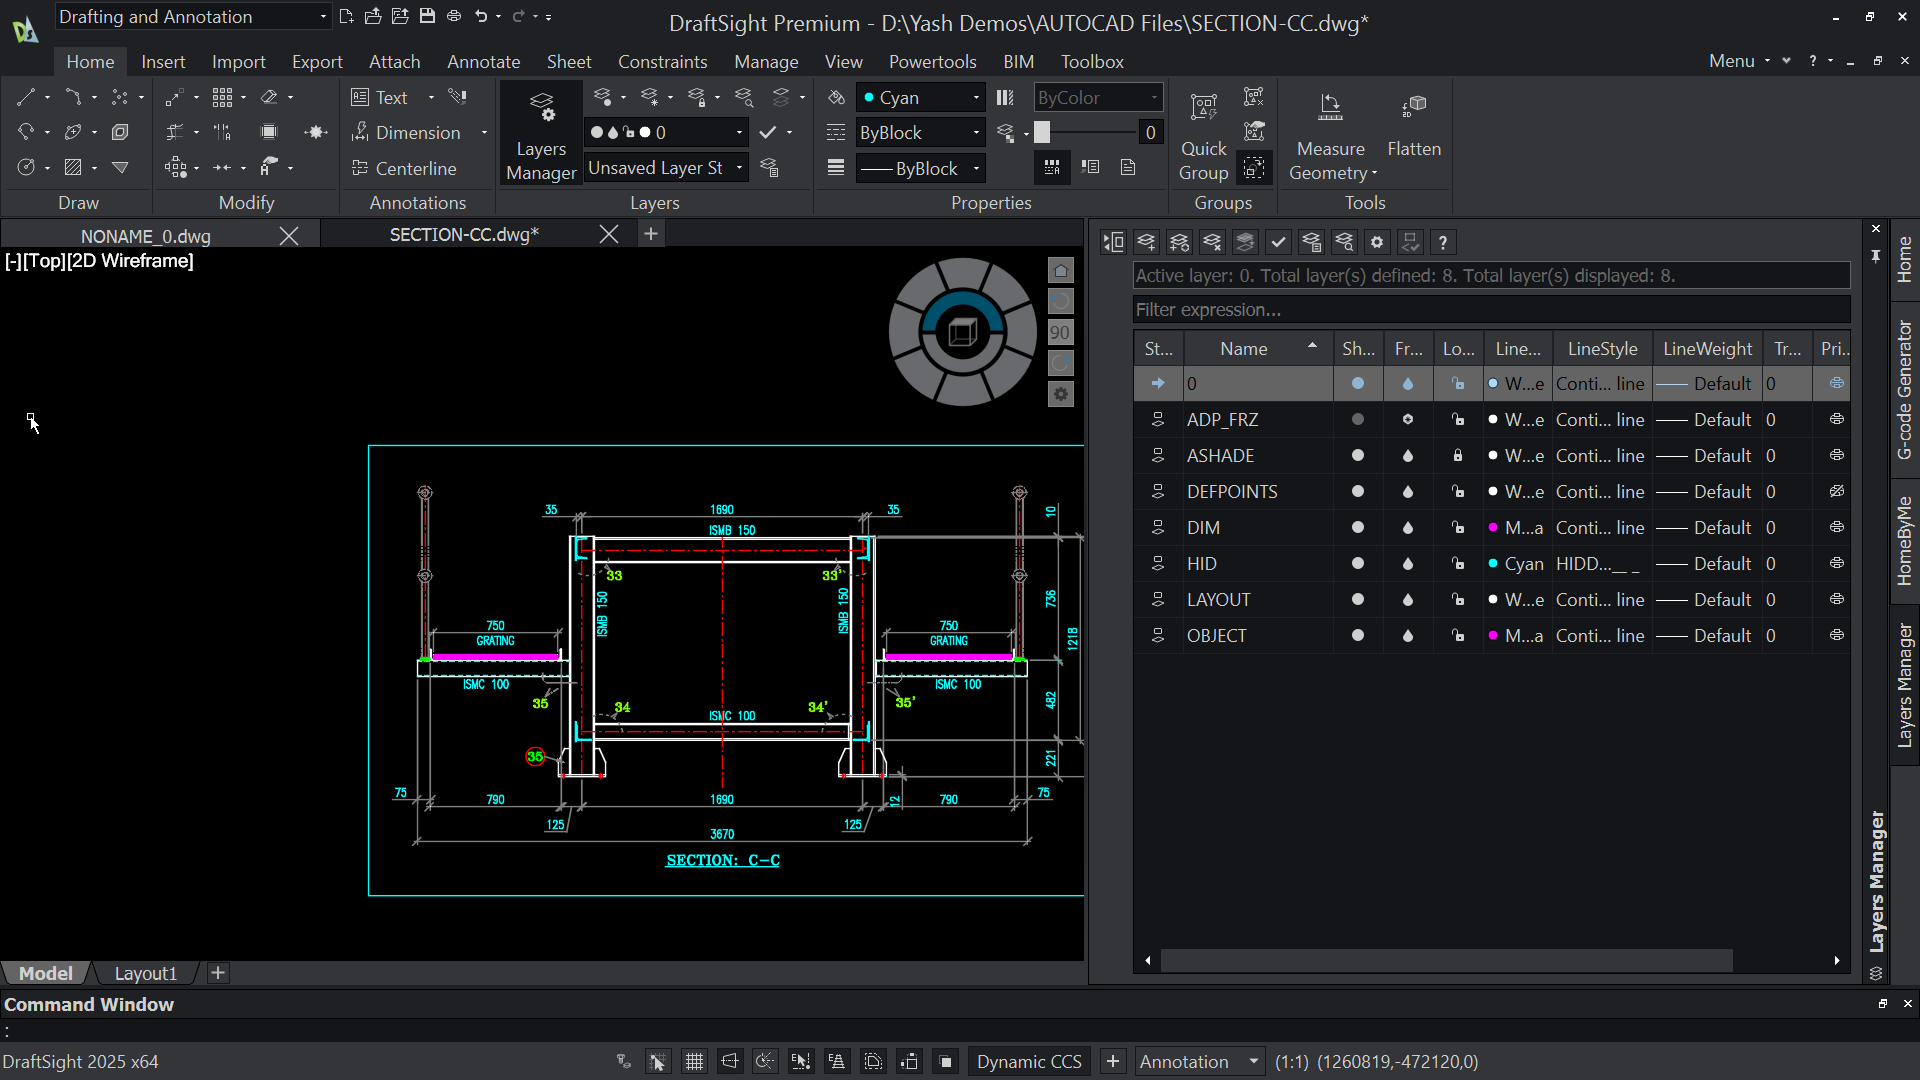
Why it matters. Manually switching layers off is slow, and worse, it is stateful — you have to remember what you turned off and turn it back on. Isolation is reversible and instantaneous. On a drawing with forty or sixty layers, the ability to reduce the world to the three layers you are working on is the difference between drafting and squinting.
How to use it.
- When you start on a detail, isolate the relevant layers rather than hunting through the layer list.
- Use group filters to stop layer lists from becoming unmanageable. Group by discipline — structure, services, architecture, annotation — or by drawing zone. Once grouped, isolation becomes a one-click operation on a whole set.
- Use Hide rather than switching a layer off when you only want temporary visual relief.
- When geometry ends up on the wrong layer — which happens constantly with imported or legacy files — reach for MatchLayer and match an entity that is already correct, instead of selecting the target layer from a list and reassigning. It is faster and it prevents typos.
Tier. Every tier.
4. Build blocks properly, then manage their attributes in bulk
What it is. A block is a named, reusable object; attributes are the editable text fields attached to it. Together they turn a symbol into a data-carrying asset. DraftSight also supports dynamic blocks, so a single block definition can carry multiple states and variations rather than you maintaining a family of near-identical static blocks.
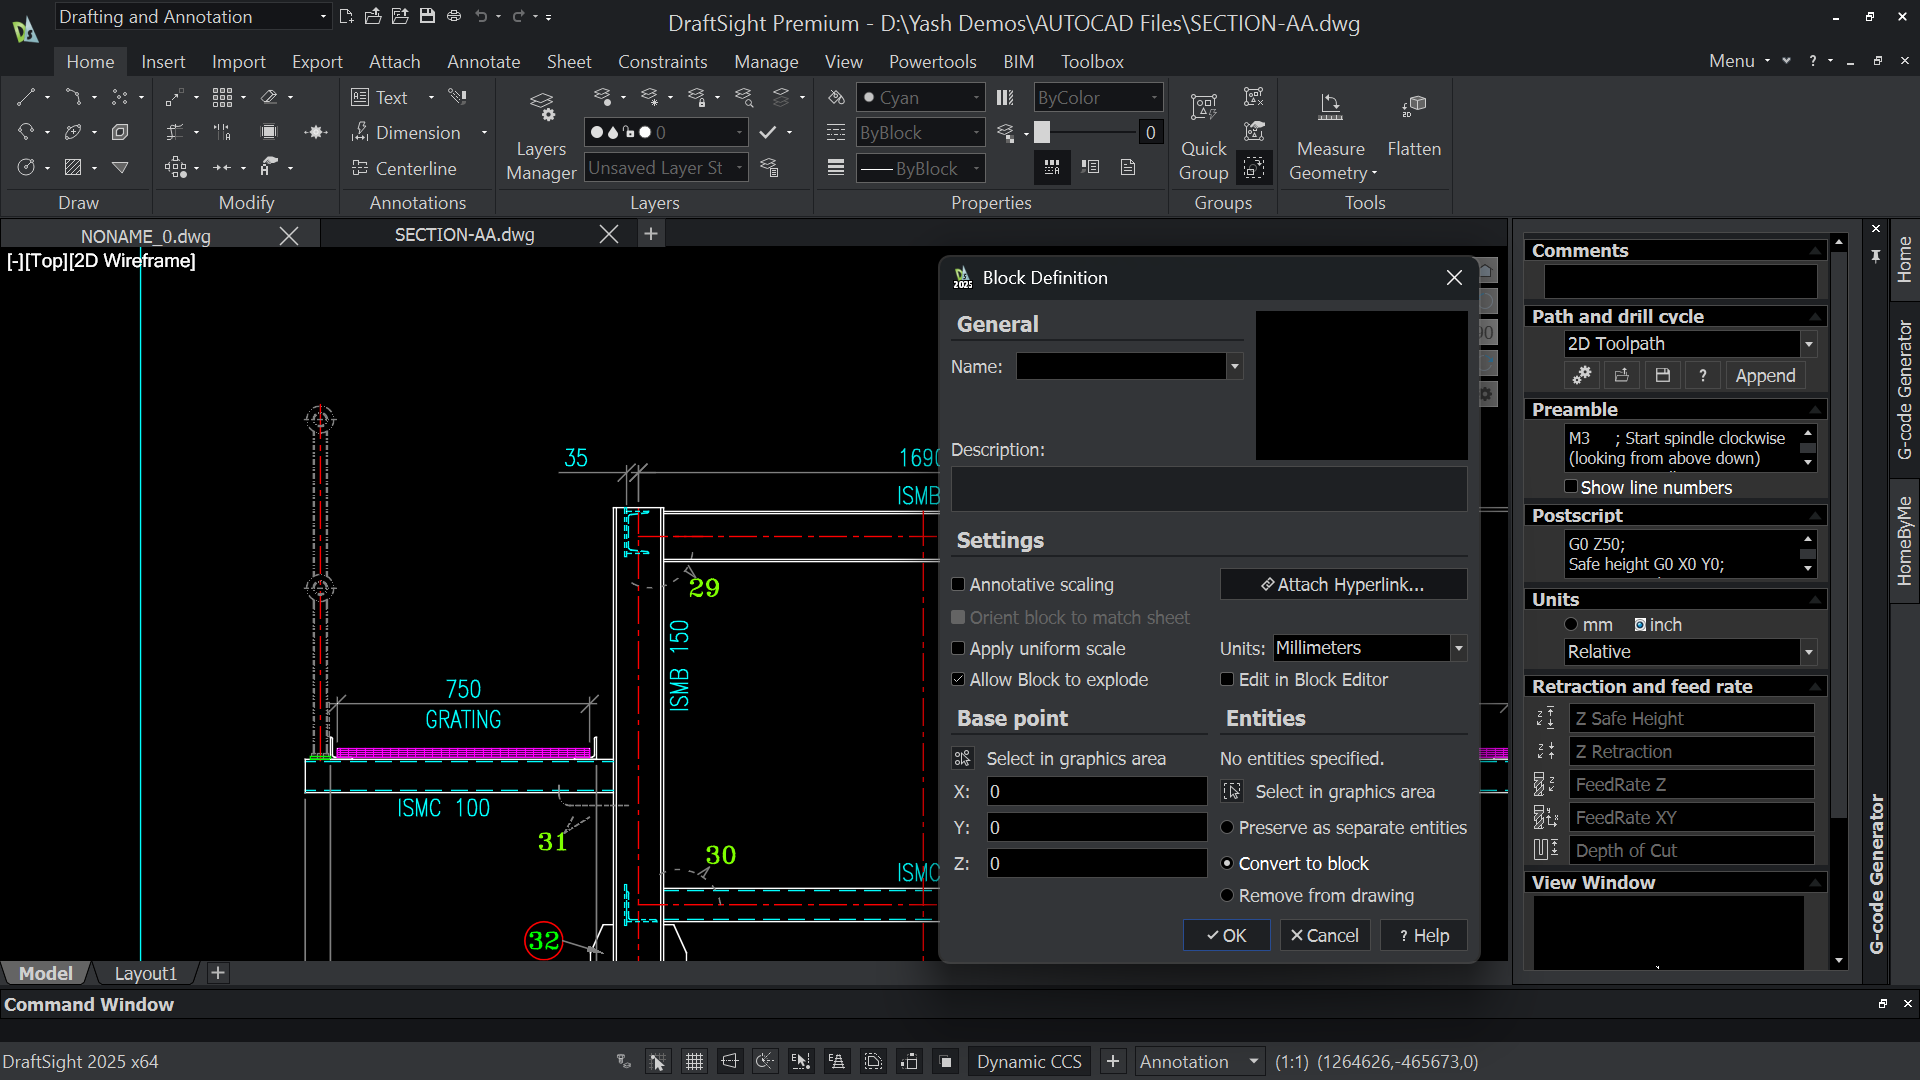
Why it matters. A well-built block is a genuine asset: place it, fill in its fields, and the same information can later be extracted automatically for schedules and bills of materials. A poorly built block is a liability — one that gets copied across drawing sets for years, carrying hard text where attributes should be, and quietly generating manual work every single time it is used.
How to use it.
- Create blocks with a deliberate base point. Most block pain in drawing offices traces back to careless insertion points, not careless geometry.
- Optimise block attributes so the information people need to change — tag numbers, part numbers, titles, ratings — is editable and, crucially, extractable. Anything that will ever appear in a schedule should be an attribute, never free text.
- Where one symbol has several states, consider a dynamic block instead of separate definitions.
- Once attributes carry real data, two commands do the heavy lifting:
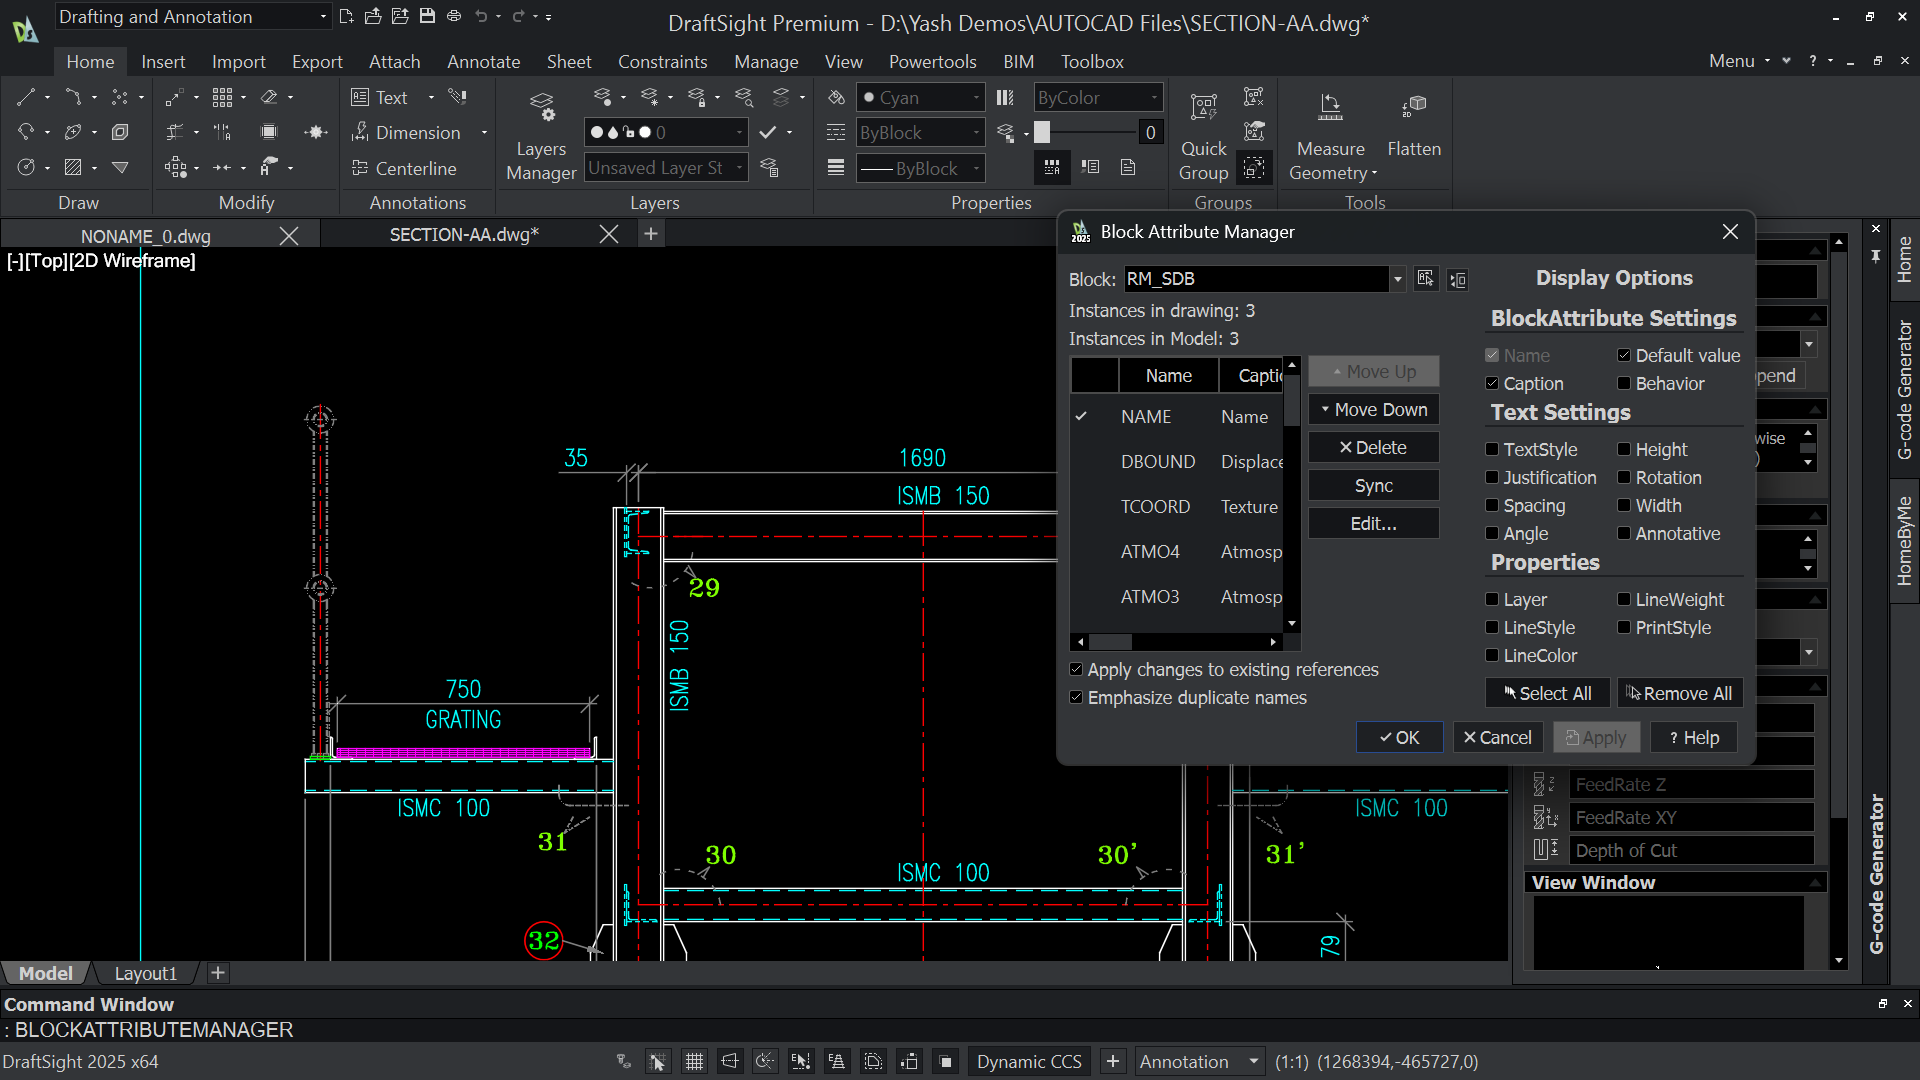
- IMPORTBLOCKATTRIBUTES — updates block attributes by importing data from an external source. Instead of opening block after block and typing corrections, you edit one source file and push the change across the drawing. This is transformative for title blocks, tag sheets and equipment lists, where the same edit often needs to be applied to dozens of instances. (Premium, Enterprise Plus, Mechanical.)
- GETBLOCKINFO — counts how many instances of a given block exist, either within a selected area or across the entire drawing, and presents the result as a table in the drawing or as an exported file. Before a release, this answers "did we actually place eleven of these, or twelve?" without you counting by hand. (Premium, Enterprise Plus, Mechanical.)
Tier. Core block attributes at every tier; the bulk management commands need Premium or above.
5. Stop redrawing repeat geometry — use Rich Lines
What it is. Rich Lines handle geometry that is really an assembly of parallel or offset components travelling together. Think of a wall with its cavity, insulation and finishes; or a track, kerb or channel profile that always looks the same in section. Instead of drawing each component line separately and keeping them aligned by hand, you define the whole set once as a rich line.
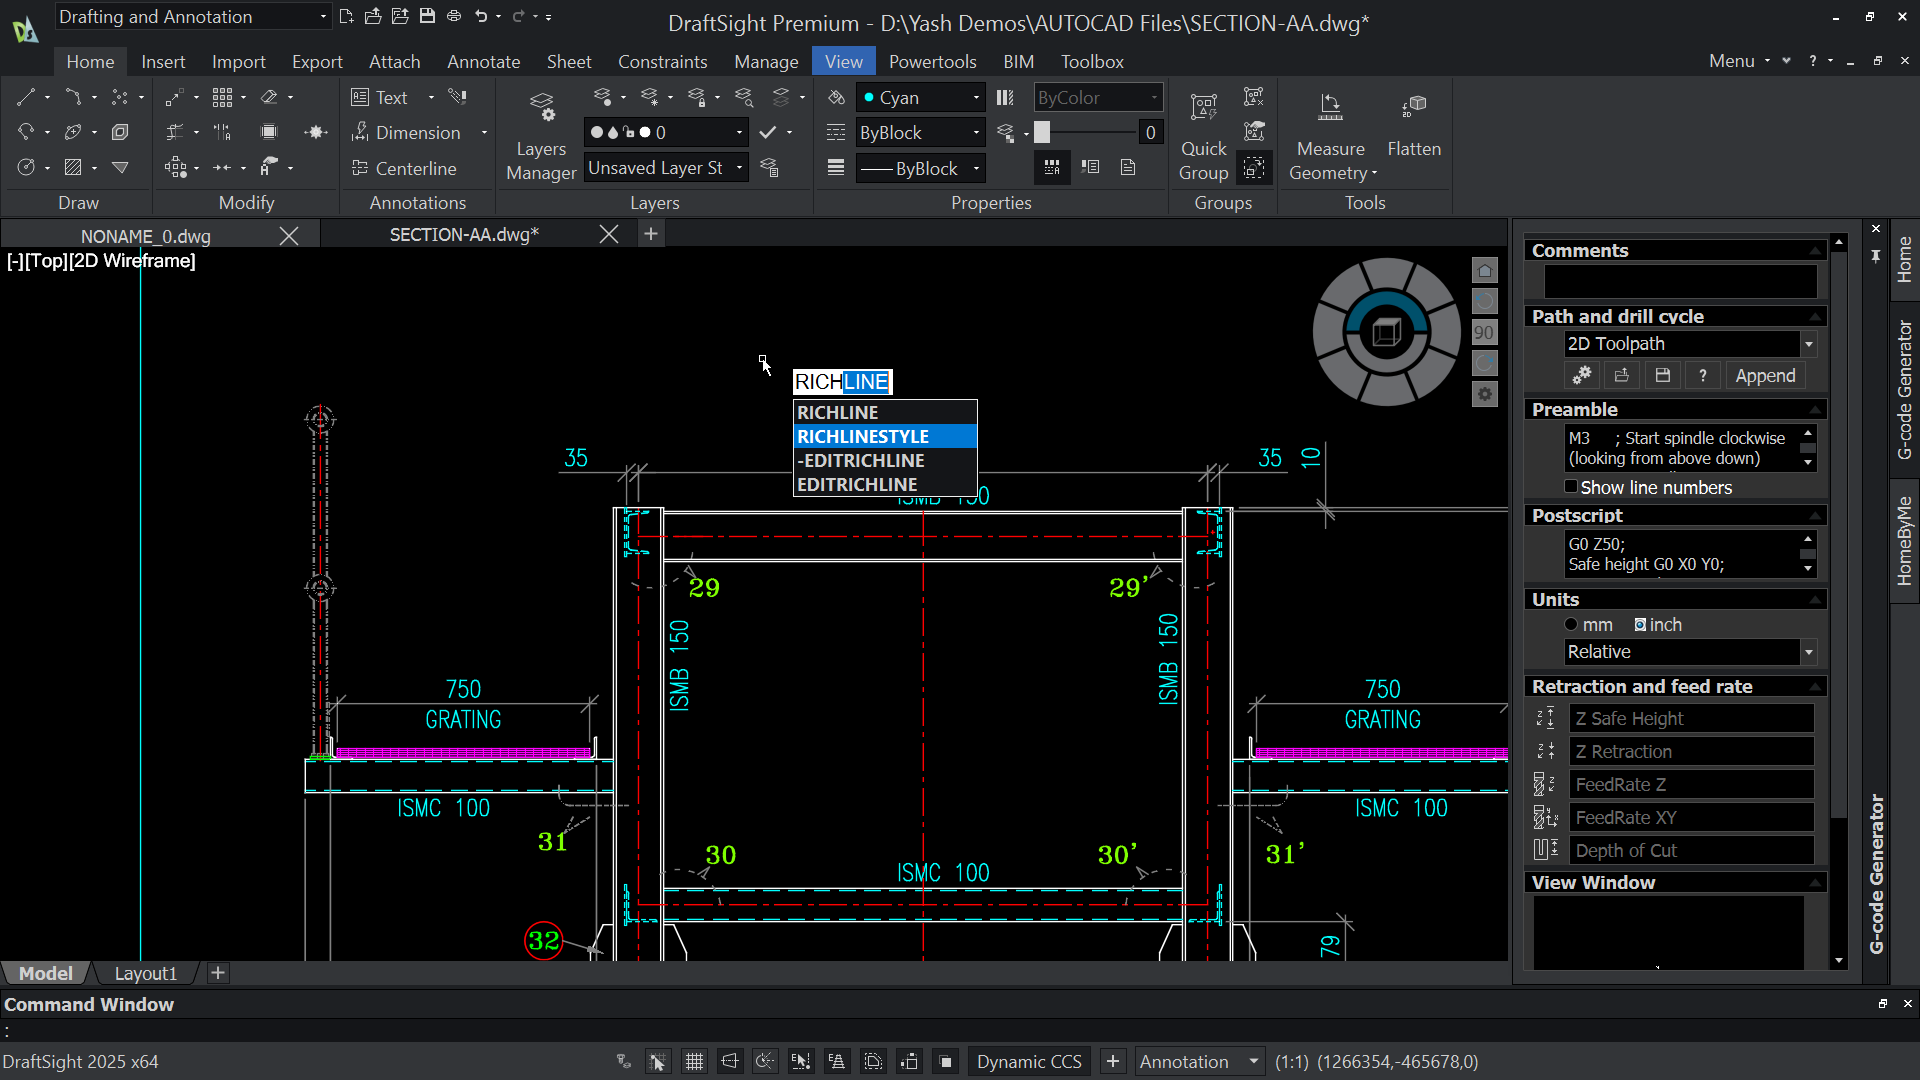
Why it matters. If your current method is to draw one component and then offset, copy or mirror the rest, you are paying a maintenance cost every time the design changes — one edit becomes six edits, and one of them will be missed. With a rich line, the components behave as a single object. Edit once, and every instance in the drawing follows.
How to use it.
- Identify geometry in your work that is genuinely repeatable in composition, not just similar in shape. Walls, trench and service runs, rail and track profiles and standard section details are the classic candidates.
- Define the rich line style with its component lines and their offsets.
- Draw using the rich line style, and edit the style rather than the instances when the composition changes.
- Apply it wherever that composition repeats — the value multiplies with the number of instances, so a detail that appears thirty times per drawing set is exactly the right target.
Tier. Every tier.
6. Use masks to hide what should not print
What it is. A mask is a blanking object. It conceals whatever geometry, hatching or annotation sits underneath it, without those objects being deleted or altered. The mask's own frame can be suppressed so it leaves no visible edge.
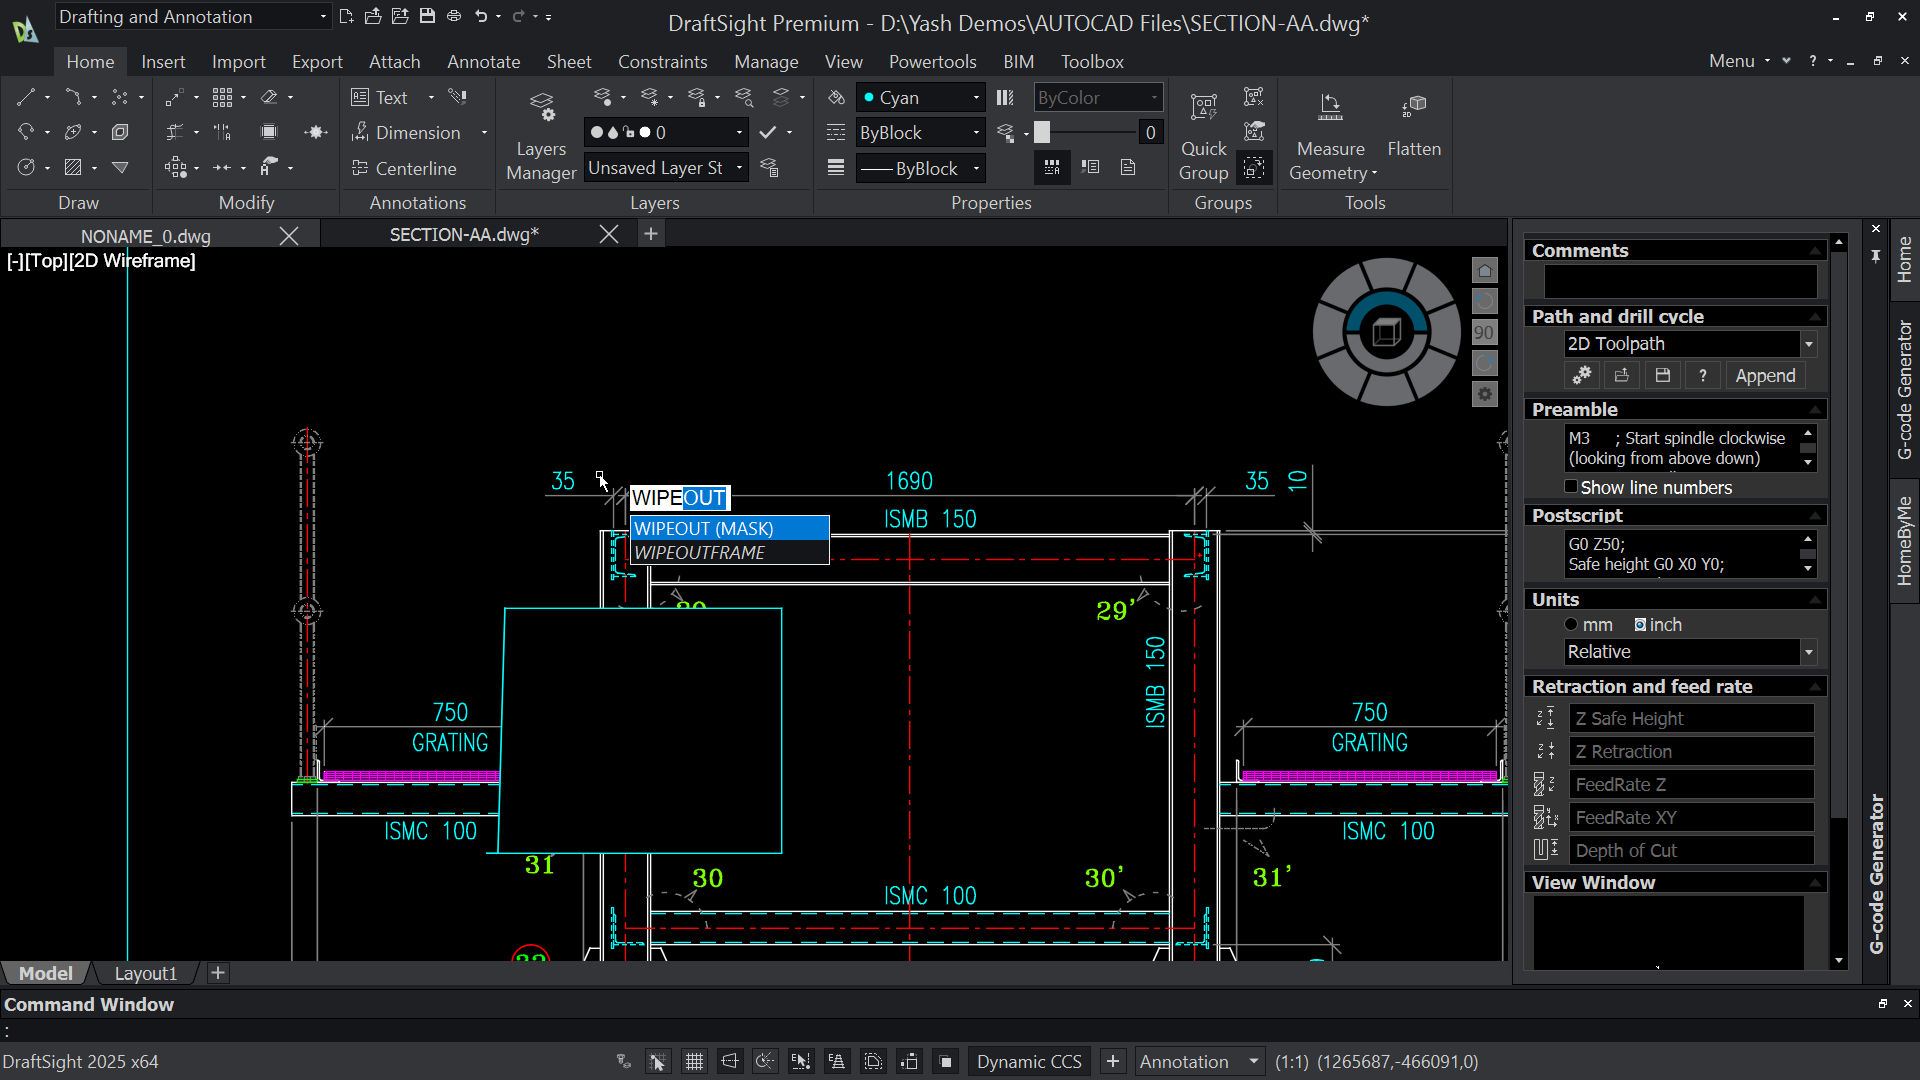
Why it matters. Most drawing clutter is not wrong geometry — it is right geometry in the wrong place visually. A dense hatch behind a note, dimensions crossing a detail, background information that fights the foreground. The instinct is to trim or erase, which destroys real design intent and creates work later. Masking solves the visual problem while leaving the model of the drawing untouched. It is also a powerful tool inside blocks: mask a region in a block definition and every placed instance carries that blanking with it.
How to use it.
- Draw the mask over the region you want to conceal.
- Switch its frame off so it reads as clean space rather than a new object.
- Place masks above the geometry that needs hiding in draw order.
- Use masks inside block definitions for title blocks and label symbols, so text always sits on clean background regardless of what is behind it.
- Remember they are non-destructive — if you need the underlying detail visible again, the mask comes off and everything is still there.
Tier. Every tier.
7. Learn the Power Tools — especially Power Trim and Batch Print
What it is. Power Tools are DraftSight's set of high-leverage production commands. They are where a lot of quiet, unglamorous hours are saved, and most users only ever discover two or three of them.
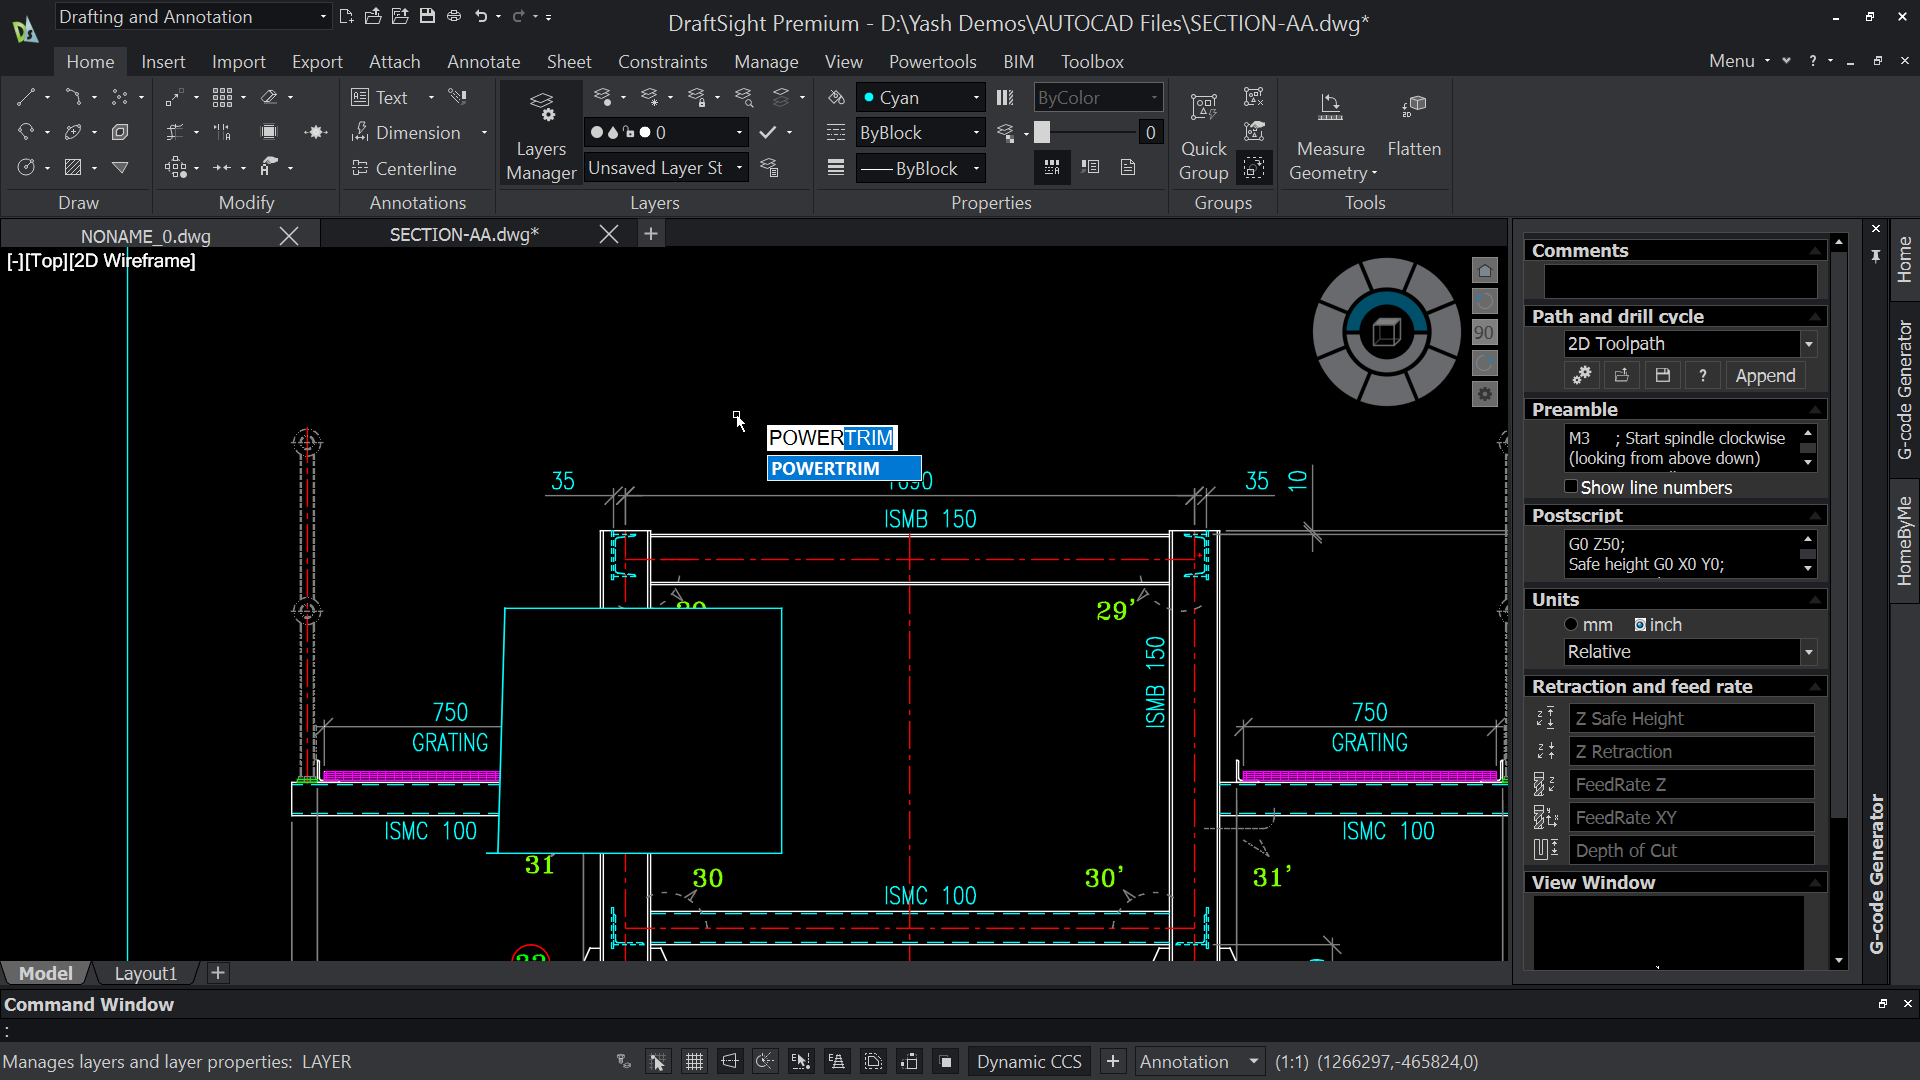
The tools worth learning first:
- Power Trim — trim multiple entities in a single pass by dragging across them, rather than picking each end individually. On cleanup work after an import, or on a detail full of crossing lines, this replaces dozens of individual picks with one gesture.
- Batch Print — plot an entire set of drawings in one operation instead of opening and plotting file by file. If someone in your office spends a Friday afternoon issuing drawings, this is the tool that gives them the afternoon back.
- Draw Compare — visually diff two versions of a drawing so you can see exactly what changed between revisions. Genuinely useful for checking a revision before it goes out, and for understanding what a supplier or consultant actually altered.
- Image Tracer — trace over a raster image to convert legacy scanned drawings, or geometry that only exists as a picture, into real DWG entities you can edit and dimension properly.
- CNC G-Code Generator — produce machine code directly from 2D geometry for fabrication work, which removes a manual translation step between drawing and machine.
- Power Dimensions — a more capable dimensioning workflow for mechanical work. This one is exclusive to DraftSight Mechanical, which also brings the mechanical and electrical symbol libraries, BOM and revision tables, GD&T support and hole charts.
Why it matters. Individually each of these saves minutes. Collectively, they change the shape of a week. The Power Tools are also the clearest example of why tier choice matters: a team doing mechanical detailing gains far more from Mechanical than from the same seats in a lower tier.
Tier. Power Tools broadly at all tiers; Power Dimensions and the mechanical entity set require DraftSight Mechanical.
8. Let Data Extraction build your schedules for you
What it is. Data Extraction gathers block and attribute data from your drawings and assembles it into a structured table — either placed into the drawing itself or exported as a file.
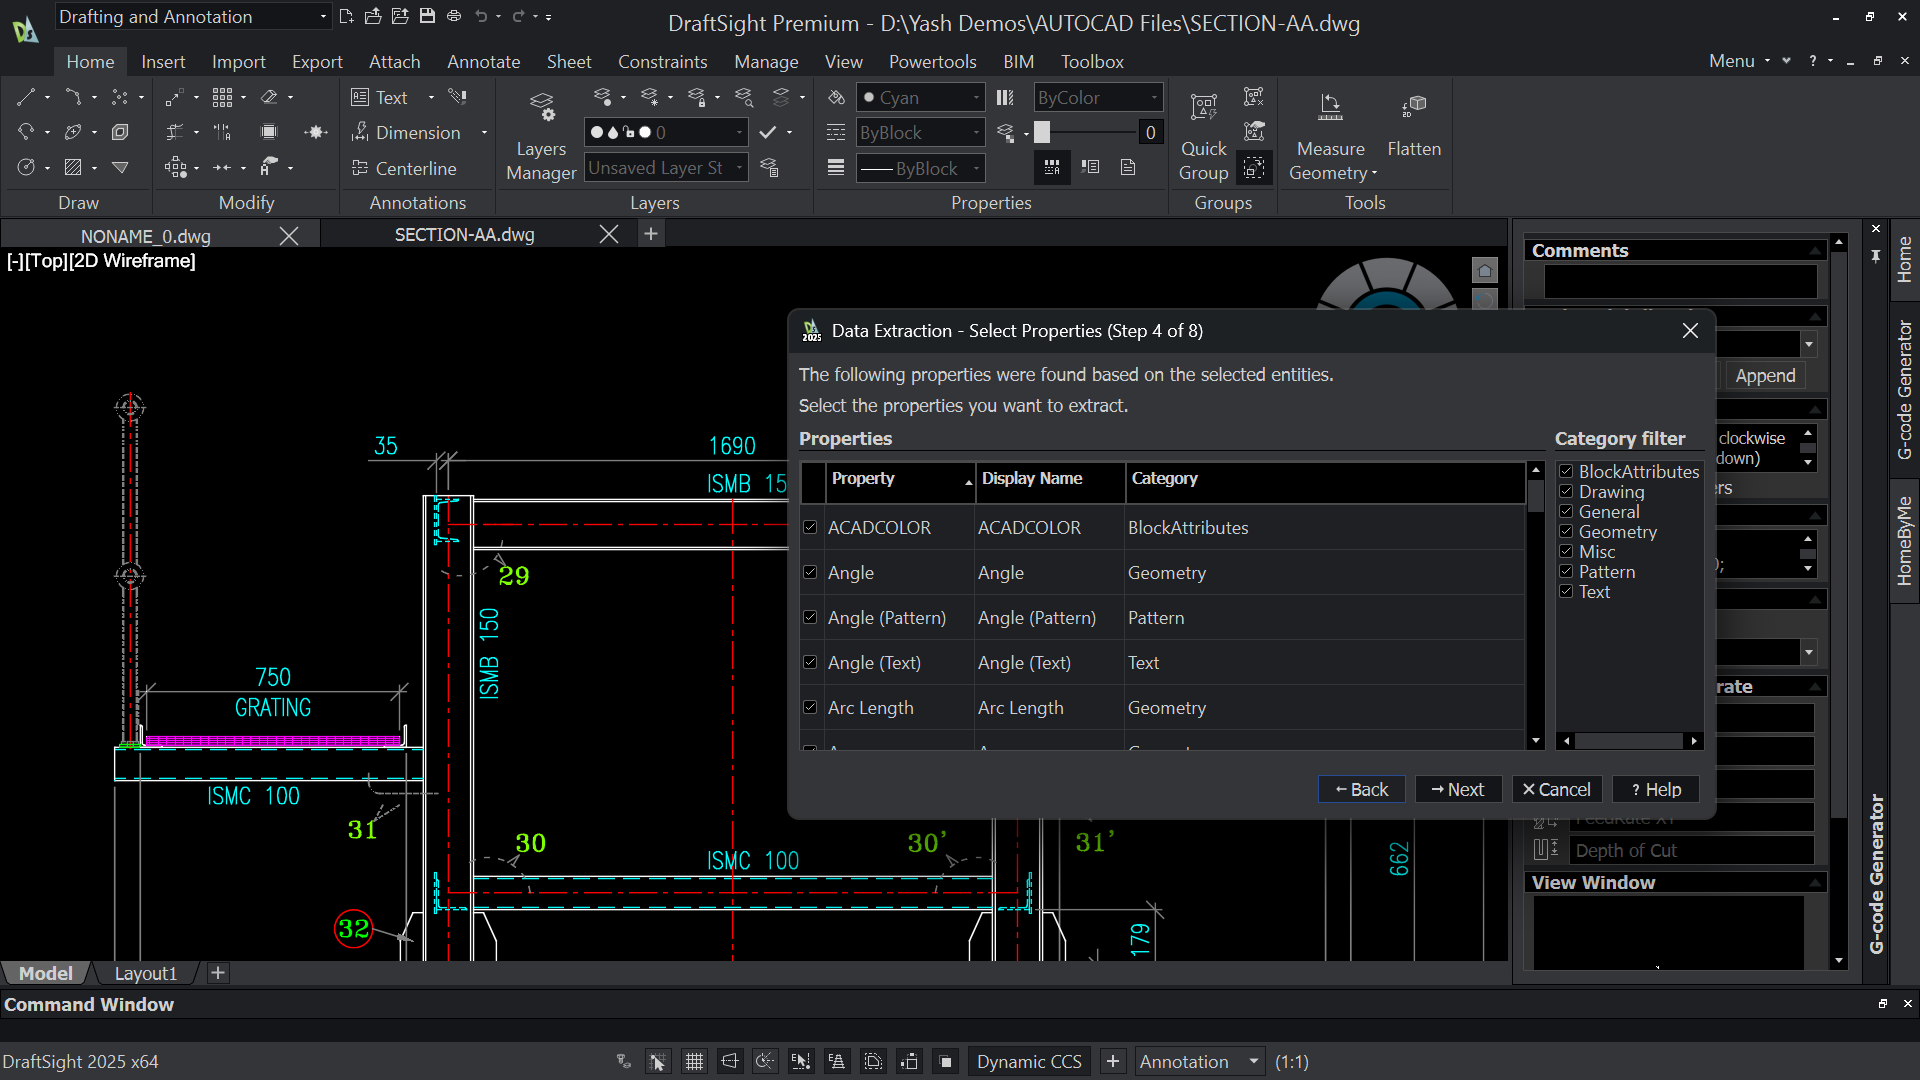
Why it matters. Schedules, bills of materials, door and window lists, cable and equipment registers — all of this information already exists inside the drawing. The moment you retype it into a spreadsheet, you create two problems: wasted time, and a second copy of the truth that will drift out of step with the drawing. Data Extraction makes the drawing the single source and generates the schedule from it.
How to use it.
- Make sure the data you want is carried in block attributes, not floating text. This is the prerequisite, and it is why tip 4 comes before this one.
- Run the extraction, choose which blocks and properties to include, and define how results are grouped and counted.
- Insert the result as a table in the drawing, or export it as a file for downstream use.
- Re-run or refresh the extraction when the drawing changes, so the schedule follows the design rather than lagging behind it.
What changed in 2026. Data Extraction gained support for formulas, and CSV export now offers an option to add headers. Practically, this means the extracted table can carry calculated columns — totals, quantities, extended values — before it ever reaches a spreadsheet, and it lands in a format that downstream tools can consume without a cleanup pass. That is a meaningful step up for anyone producing quantity schedules from drawings.
Tier. Every tier.
9. Import PDFs as editable geometry, and export clean issue packs
What it is. DraftSight exports to PDF at every tier, so issuing a drawing is never a constraint. The more interesting capability is PDF import, which converts PDF geometry, text and layers into editable DWG entities. DraftSight also imports CATIA drawings directly.
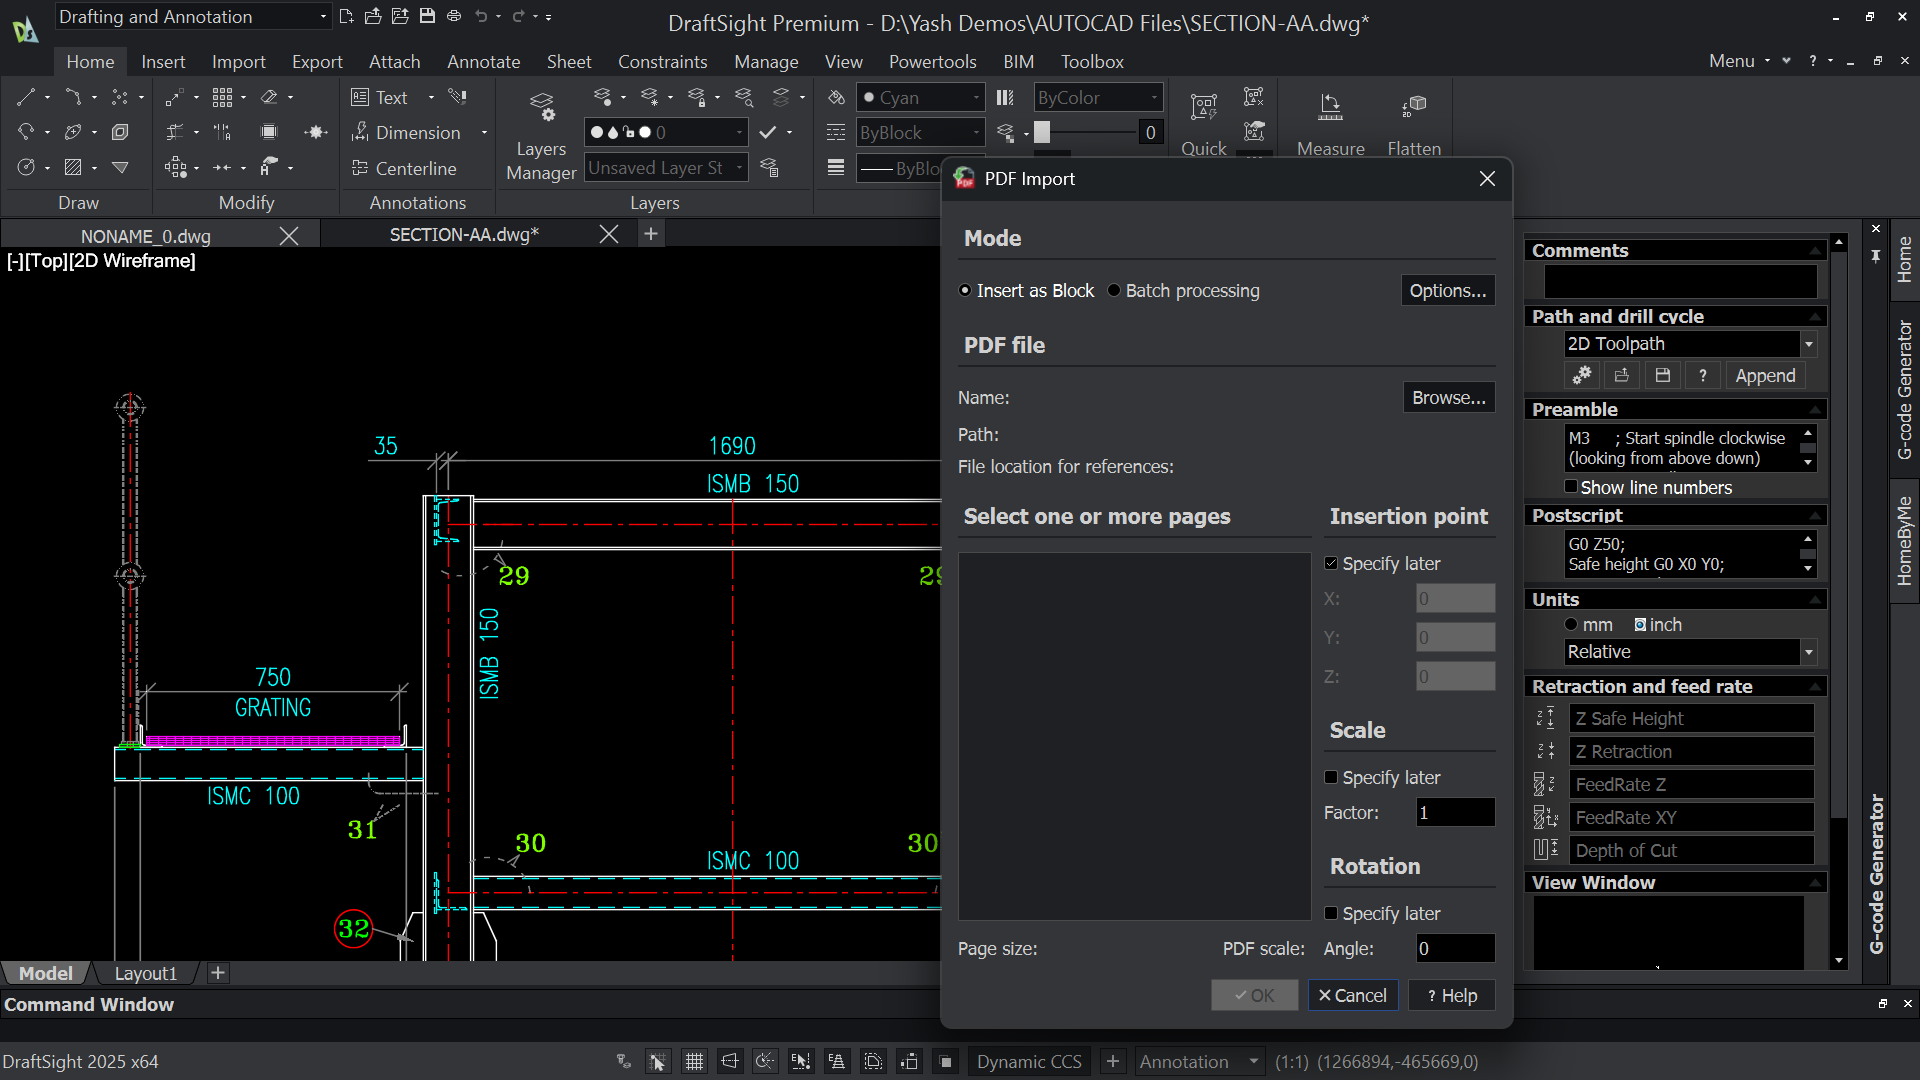
Why it matters. A very large share of the drawings a working drafter handles were not created in-house. They arrive from suppliers, consultants, clients, legacy archives and contractors — frequently as PDFs, because that is the format people are willing to share. Without import, a PDF is a picture you can only look at; the alternative is redrawing it. With import, it becomes geometry you can actually work on: dimension it, edit it, layer it, and fold it into your own drawing set.
How to use it.
- Where a supplier sends a PDF that you need to modify or build on, import it rather than redrawing from a screenshot.
- Expect to do some layer cleanup afterwards — imported geometry rarely arrives on your standards. This is exactly what MatchLayer (tip 3) and Power Trim (tip 7) are for, and it is still dramatically faster than starting from nothing.
- For CATIA-originated work, use the direct drawing import rather than routing files through a converter.
- For issuing, use PDF export to produce the draw-and-print set, and reserve the DWG for parties who genuinely need to edit.
Tier. PDF export at every tier; PDF import and CATIA import at Premium, Enterprise Plus and Mechanical.
10. Automate the repetitive parts — LISP and DIESEL
What it is. DraftSight supports LISP and Visual LISP at every tier, plus a fuller API (C#, .NET, VB) for deeper customisation. DraftSight 2026 adds DIESEL expressions, a string-based macro language that generates text dynamically.
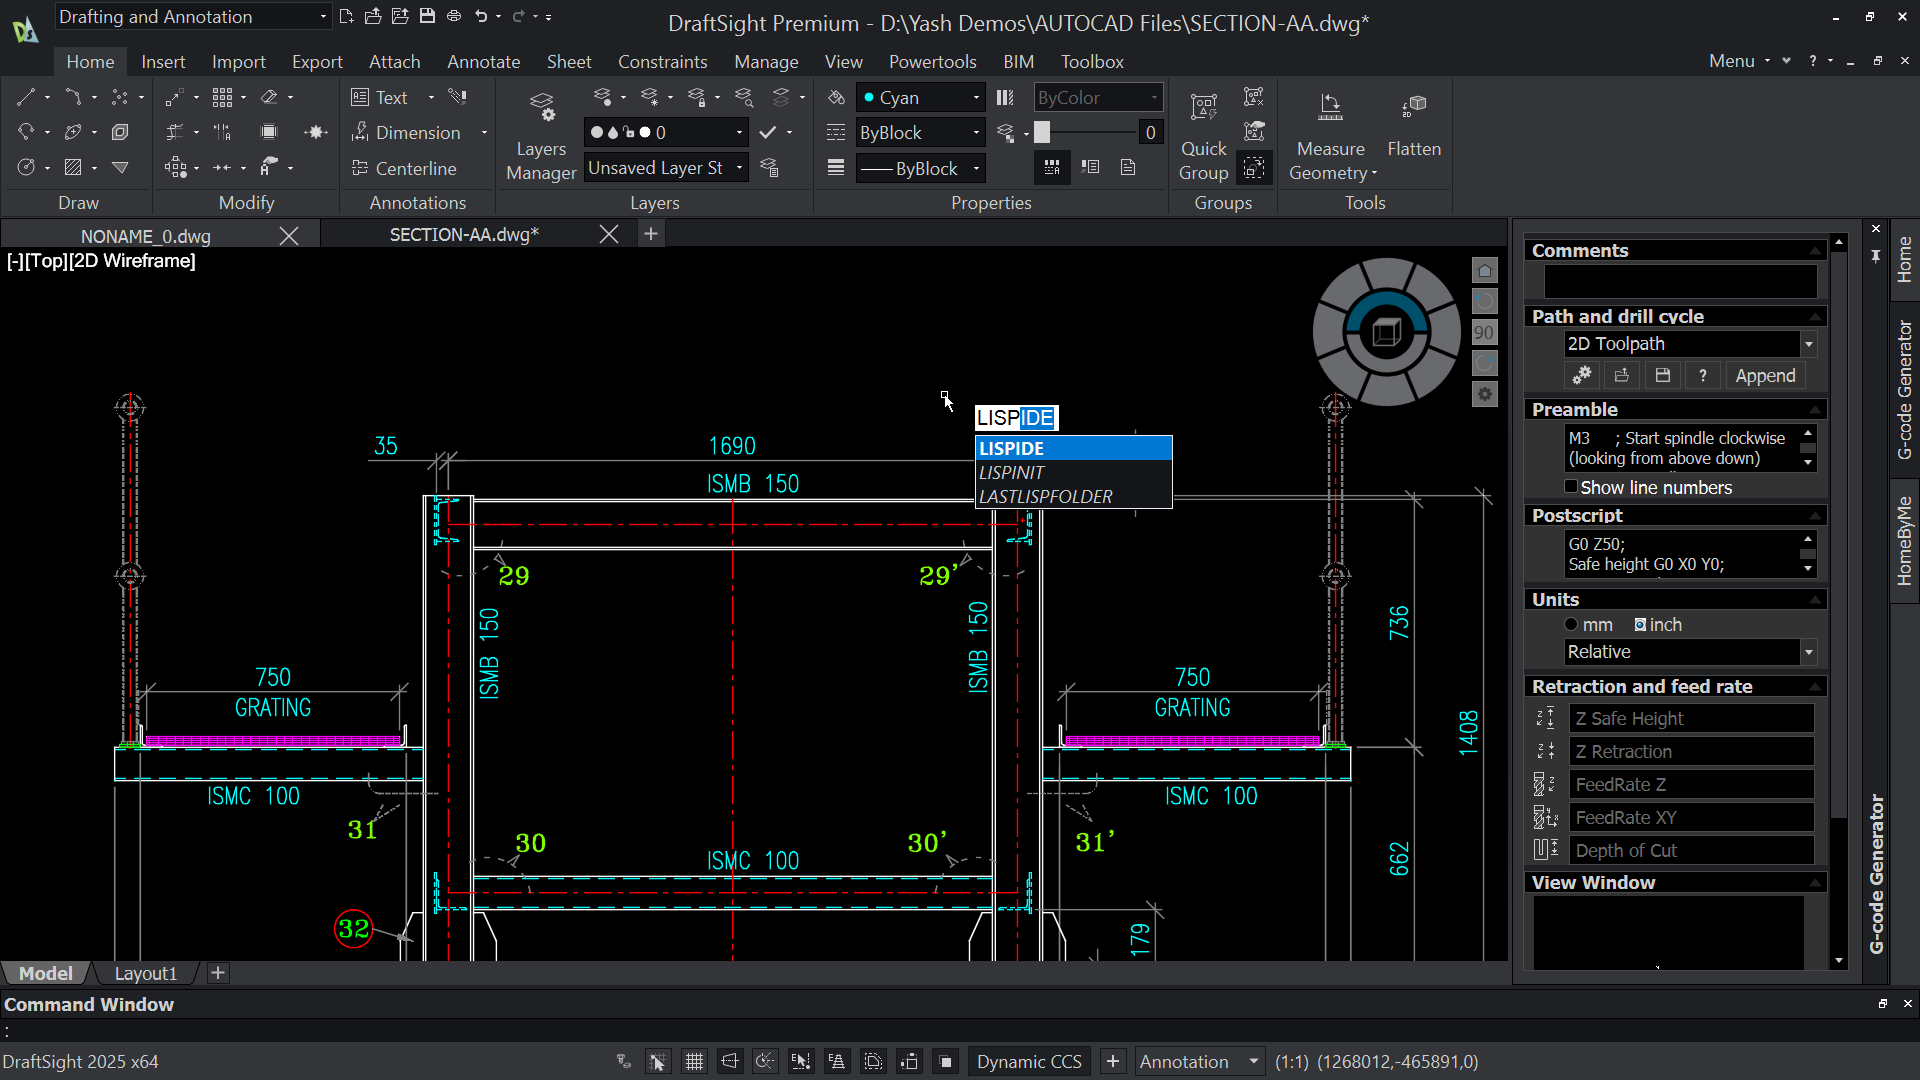
Why it matters. Every drawing office has one or two jobs that are pure repetition — renumbering a tag series, normalising layers on imported files, generating a standard note, cleaning up a file that arrived from outside. These are not design decisions; they are mechanical tasks that consume attention without consuming judgement. That is precisely what automation is for.
The reason this matters especially to anyone migrating from AutoCAD: existing AutoLISP and Visual LISP routines continue to run. An in-house automation library built over fifteen years does not have to be thrown away or rewritten. It moves with you. For a drawing office, that is often worth more than the licence saving.
How to use it.
- Pick the single most resented repetitive task in your week. Not the most complex — the most repeated.
- Check whether a built-in Power Tool already covers it before writing anything.
- If it does not, write or adapt a small LISP routine. Automations do not need to be clever; they need to be reliable and used.
- Use DIESEL expressions for dynamic text that should reflect the current drawing state — status bar entries, menu items and custom commands that pull system variables rather than showing static labels.
- For teams, note that Enterprise and Enterprise Plus add a deployment wizard, which makes rolling out a standard configuration and routine library across many machines manageable rather than a manual chore.
Tier. LISP and Visual LISP at every tier; DIESEL expressions at every tier in 2026; deployment wizard on Enterprise and Enterprise Plus.
Bonus: what's new in DraftSight 2026 worth knowing
If your team is planning a version upgrade, these are the additions that change daily work rather than polishing the edges.
- Floating Windows — drag a drawing tab onto a second monitor and work on two files side by side within the same session. This is a genuine workflow change for anyone who keeps a reference drawing open while editing another; the alt-tab shuffle disappears. (Premium, Enterprise Plus, Mechanical.)
- Start Page — a launch hub with recent files, favourites, templates, learning resources and update notifications, replacing the blank-start experience. (Premium, Enterprise Plus, Mechanical.)
- Pattern Ribbon — every pattern and array tool consolidated into a single ribbon tab, so you stop hunting across panels for related commands.
- Hatch Gradient — gradient hatch fills for presentation-quality drawings and clearer detail callouts.
- Custom Colour Books — full Pantone access or your own uploaded libraries, for brand-accurate and project-consistent colour. (Premium, Enterprise Plus, Mechanical.)
- ECW file support — compressed raster imagery such as aerial and satellite maps, at high quality without the performance penalty you would normally expect from large images.
- DIESEL expressions — described in tip 10, and available across the tiers.
- Also new: Select & Replace Path for xREFs (useful when a drawing set is re-pathed or moved), Scale Copy, wildcard-supporting rename, PCX print files for custom plot page sizes, columns support for NOTE, and Resize View Tiles (Premium and above).
- Premium and Mechanical only: HATCHPATTERN for defining or inserting custom
.pathatch definitions directly in the drawing environment.
Where to start — a realistic sequence
You do not need all ten. Trying to adopt everything at once is the most reliable way to adopt nothing.
Week one: switch to command-line-driven drafting (tip 1) and set up mouse gestures with a trimmed heads-up display (tip 2). These cost one sitting, they apply to every drawing you touch afterwards, and they need no new licence or permission. Nothing else on this list repays a single hour as reliably.
Week two: fix your blocks. If your schedule data lives in hard text rather than attributes (tip 4), you cannot benefit from Data Extraction (tip 8) no matter how many times you run it. These two tips are a pair, and the block work has to come first.
Then: take the one repetitive job you resent most each week and find out whether it is already covered by a Power Tool (tip 7), by Data Extraction (tip 8), by a mask (tip 6) or by a small LISP routine (tip 10). That is where the compounding savings actually live — not in big dramatic changes, but in the removal of small repeated friction.
The honest summary: tips 1, 2, 3 and 6 are available to every DraftSight user at every tier, and they are free. Start there. If you find yourself limited by the ones that need Premium or above, that is a tier question — and it is a much easier conversation to have once you know exactly which feature you are missing and why you want it.
Trying to work out which DraftSight edition covers the features your team actually needs? Talk to us at CustomizeCAD — we will map your drafting workflow to the right tier rather than upselling you into capability you will not use. A 30-day Premium trial is available if you want to test the productivity tools before committing.